


Need estimation?
Leave your contacts and get clear and realistic estimations in the next 24 hours.
Thank you! Your submission has been received!
Oops! Something went wrong while submitting the form.

Table of contentS
Navigating the modern world often requires more than just directions; it demands a seamless and interactive mapping experience.
In an era where location-based services have become integral to countless applications, integrating powerful mapping tools has become a fundamental need for developers. Among the great number of mapping services available, Google Maps stands tall as a reliable and feature-rich platform.
Whether you're creating a travel app, a food delivery service, or even a fitness application, harnessing the potential of Google Maps can elevate your user engagement to unprecedented heights. Google Maps integrations play a vital role in enhancing user experiences across various applications.
In this blog post, we will delve into the essential steps and best practices on how to integrate Google Maps into app, unlocking the doors to a world of location-based possibilities. So, let's learn how to integrate Google Maps into an app! Enhance your app's spatial awareness and user engagement through efficient Google Maps app integration, delivering interactive mapping solutions with precision and ease.
Google Maps integrations go beyond basic navigation. Whether you're building a location-based app, a delivery service, or a real estate platform, incorporating Google Maps into your application can significantly enhance user experience. Integrating Google Maps into app isn't overly complex, but it does require a solid understanding of back-end programming, specifically in Java. Let's break down the step-by-step process.
Before delving into the programming specifics, you'll need to get a Google Maps API key. This key is unique to your application and allows Google to authenticate your app's requests.
To integrate Google Maps into app on the backend, you need the Java client library for Google Maps API Web Services. Here's how to set it up.
Add the following Maven dependency in your pom.xml:
<dependency>
 <groupId>com.google.maps</groupId>
 <artifactId>google-maps-services
  <version>(latest version)</version>
</dependency>
Now, for integrating Google Maps into app, initialize the GeoApiContext:
GeoApiContext context = new GeoApiContext.Builder()
    .apiKey("YOUR_API_KEY")
    .build();
Replace "YOUR_API_KEY" with your actual API key. This context enables you to access various Google Maps services such as Geocoding, Directions, and Places.
Let's assume you want to add geocoding to your application. Use the GeocodingApi class:
GeocodingResult[] results = GeocodingApi.geocode(context, "1600 Amphitheatre Parkway Mountain View, CA 94043").await();This code will convert the address to its latitude and longitude. You can use the .lat and .lng properties on results[0].geometry.location to get these values.
How to integrate Google Maps correctly? With a clear understanding of your requirements and careful implementation, you can add useful features to your app that can greatly improve user experience. Remember to adhere to Google's usage policies and secure your API keys appropriately to prevent misuse.
Google Maps adds significant value to your web application by providing a map view of a specific area. How to integrate Google Maps into an app in terms of the front end? This integration offers several benefits regarding the front end:
Since many modern web projects are built using the React framework, let’s follow the instructions on integrate Google Maps into app based on React:
A starting point in Google Maps integration is to create a project in Google Cloud Console. The platform generates an API Key associated with that project, which serves as a form of authentication and access control when using Google Maps services within an application. To generate an API Key, follow these steps:
Additionally, you should enable the Maps JavaScript API service by following these steps.
Let’s start by creating a new React application using Create React App or your preferred method.
npx create-react-app project-name
cd project-name
There are several good libraries to work with Google Maps in React. In this guideline, we will use the @react-google-maps/api library. Let's install this dependency using npm or yarn.
npm i @react-google-maps/apiThe @react-google-maps/api library is a React wrapper for the Google Maps JavaScript API. This library abstracts much of the boilerplate code and complexities associated with working directly with the Google Maps JavaScript API, allowing you to focus on building interactive and feature-rich map-based applications using the familiar React paradigm.
Create a file named .env in the root folder and add the following line to it, replacing YOUR_API_KEY with your actual API key.
REACT_APP_GOOGLE_MAPS_API_KEY=YOUR_API_KEYLet’s proceed to a component where you want to display the map. In the example below, we will add this logic to the App component. The @react-google-maps/api library provides a set of components and hooks that allow you to interact with Google Maps. The core ones are:
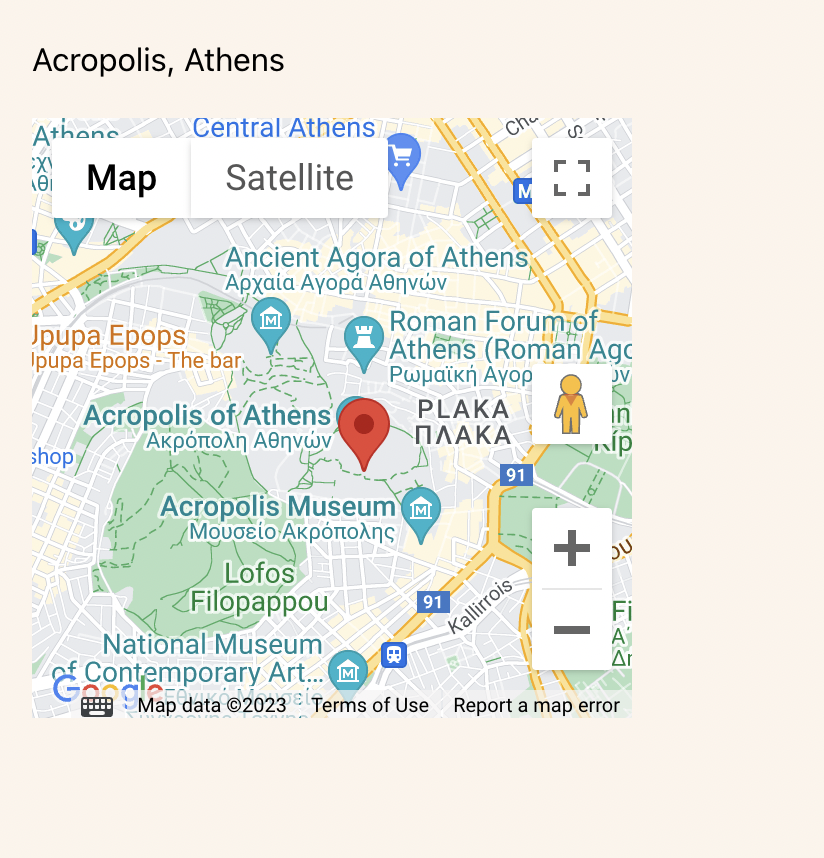
Now let’s gather these components in the App.js file to create a map view.
import React from 'react';
import { GoogleMap, LoadScript, MarkerF } from '@react-google-maps/api';


// Coordinates of Acropolis in Athens, Greece
const center = {
  lat: 37.970833,
  lng: 23.726110,
};

function App() {
  return (
    <div className="App">
      <LoadScript googleMapsApiKey={process.env.REACT_APP_GOOGLE_MAPS_API_KEY}>
        <span>Acropolis, Athens</span>
        <GoogleMap
          mapContainerClassName="map-container"
          center={center}
          zoom={15}
        >
          <MarkerF position={center} />
        </GoogleMap>
       </LoadScript>
    </div>
  );
}

export default App;
We also need to add some styles in the index.css file to prettify our layout.
.App {
margin: 20px;
}

.map-container {
  margin-top: 20px;
  height: 300px;
  width: 300px;
}
And that’s it - we can already see the result of integrating Google Maps.
You can now customize the map, add more features, or integrate additional components like info windows, polygons, or directions depending on your specific application.
By following the steps above, you can seamlessly integrate Google Maps into your React application, enhancing its functionality and providing users with valuable location-based services. Whether you're building a business application, a travel app, or anything in between, the power of Google Maps can greatly enrich your user experience.
How to integrate Google Maps in Android app? This part will show how to set up Google Map SDK for Android and its basic usage in an Android app.
Elevate your Android app's location-based functionalities by learning how to integrate Google Maps seamlessly, enhancing user experience and providing accurate and interactive mapping services with a step-by-step guide on how to integrate Google Maps in an Android app.
How to add Google Maps to Android app? The Google Maps SDK for Android is a set of tools and APIs that allows the integration of interactive maps and location-based services into Android applications. It enables users to display maps, add markers, obtain user location, calculate routes, and access various mapping and location-related features within Android apps. To use Google Maps in Android app, follow these steps:
So how to integrate Google Maps in the Android app? To start using Google Maps API, first of all, you must obtain the API key from the Google Cloud Console (https://console.cloud.google.com).
Open the GCC and create new or select an existing project.
Then, enable the "Maps SDK for Android" API and generate an API key for the selected project.
When developing the Android app, you add some external libraries, modules, or components that your app module relies on to provide additional functionality or features.
To add maps functionality into the app you need to create a new or open existing project in Android Studio.
Next, in your app-level build.gradle file, add the following dependencies under the dependencies section:
implementation 'com.google.android.gms:play-services-maps:<latest_stable_verison>'
Implementation ‘com.google.maps.android:maps-compose’ (optional)
If you are using Jetpack Compose in your app, you will need to add ‘maps-compose’ dependency, in other cases, it’s not necessary.
Google Map API integration requires key configuration. By adding the API key to the <meta-data> element in the AndroidManifest.xml, your Android app will be able to access the Google Maps API or any other Google services that require the API key. Make sure to keep your API key secure and avoid hardcoding it if you plan to publish your app, as this could make it vulnerable to unauthorized access. Instead, consider using build flavors, build config files, or a secure backend server to manage API keys in production-ready apps.
Add the following element as a child of the <application> element:
<meta-data
android:name="com.google.android.geo.API_KEY"
android:value="MAPS_API_KEY"/>
Replace "MAPS_API_KEY" with the API key obtained in the previous step.
To use the Google Maps SDK for Android, you need to add appropriate permissions to your app's AndroidManifest.xml file. The required permissions depend on the features you want to use within the Google Maps SDK. Here are the most common permissions needed:
<uses-permission android:name="android.permission.INTERNET" /> - maps sdk requires internet access to load map tiles and other data.
<uses-permission android:name="android.permission.ACCESS_FINE_LOCATION"/>
or
<uses-permission android:name="android.permission.ACCESS_COARSE_LOCATION"/>
If your app needs to display the user's current location on the map or use location-based services, you need to declare ACCESS_FINE_LOCATION. But if you only need approximate location information, you can use the ACCESS_COARSE_LOCATION permission, which requires less precision than the fine location permission.
Handling runtime permission checks is essential to ensure the user grants the necessary permissions during app runtime.
This step depends on which kind of UI layout you use: XML and Jetpack Compose.
Using layout XML
If you use layout XML-based UI, you need to add MapFragment or MapView into the layout. For example, using a MapView, you need to add this code into xml layout:
<com.google.android.gms.maps.MapView
    android:id="@+id/mapView"
    android:layout_width="match_parent"
    android:layout_height="match_parent"/>
Next, you need to initialize the GoogleMap object in your Activity or Fragment. In your Activity or Fragment, initialize the GoogleMap object by calling getMapAsync() on the MapView or MapFragment. For example, in onCreate() method:
mapView.getMapAsync(object : OnMapReadyCallback {
   override fun onMapReady(googleMap: GoogleMap) {
        // Customize and interact with the GoogleMap object here
   }
})
Using Jetpack Compose
If you use Jetpack Compose, then you just need to add GoogleMap composable into the composable hierarchy. This example shows adding GoogleMap, which fills available space inside the container. By just calling GoogleMap(), you can show a map in the app. Quite simple because GoogleMap is a compose container for MapView.
Inside a composable container GoogleMap can be added as an example:
Column(
modifier = Modifier
.fillMaxSize()
.background(MaterialTheme.colors.background)
.padding(16.dp)
) {
		GoogleMap( params… )
}Inside the onMapReady() callback or when initializing the GoogleMap Composable, you can customize the map per your requirements. For example, you can add markers, set the map type, enable user gestures, etc.
Some parameters can be set in GoogleMap Composable:
Using XML-based MapView, these settings can be configured inside onMapReady callback:
mapView.getMapAsync { googleMap ->
    	googleMap.uiSettings.isZoomControlsEnabled = true
googleMap.uiSettings.isMyLocationButtonEnabled = true
googleMap.uiSettings.isCompassEnabled = true
googleMap.setOnMapClickListener { latLng ->
       // Handle map click event here
}
googleMap.setOnMapLoadedCallback {
       	      // Handle map loaded event here
}
    	googleMap.setOnMyLocationButtonClickListener {
      // Handle My Location button click event here
    }
}
The Google Maps SDK for Android allows to integrate powerful mapping and location-based services into Android applications. Adding the SDK to the projects allows you to display interactive maps, add markers, draw routes, and access geospatial data.
The SDK provides a range of features, such as customizing map styles, enabling user location tracking, and implementing map gestures.
Now, use Google Maps in Android app to leverage powerful mapping and location-based services, enhancing the user experience with dynamic and interactive map functionalities.
The steps that we provided above will help to get started with maps integration and use Google Maps in Android app. Still, for more information about your business requirements, you will also need to check the official documentation from Google.
Integrating Google Maps into an app can greatly enhance its functionality, but the process is not without its challenges. Below are some common problems developers encounter and solutions to address them:
By anticipating these common problems and implementing the recommended solutions, developers can create robust and user-friendly applications that leverage the power of Google Maps effectively. For those asking, "Can you use Google Maps in your own app?" or "How to integrate Google Maps API into my app?", following these guidelines will ensure a smoother integration process and a better user experience.
The number of team members required for Google Maps integration depends on various factors, including the complexity of the integration, the scope of the project, the platform(s) you are targeting (web, mobile, or both), and the specific skills and expertise of the team members.
In general, a typical team for a Google Maps integration project might include:
Here are some general estimates to provide a rough idea:
It's important to consider that unexpected challenges or custom requirements may arise during development, which can impact the overall timeline. Additionally, thorough testing and quality assurance are essential to ensure a reliable and bug-free integration.
Learn how much it costs to develop a parking app!
Axon takes pride in offering cutting-edge solutions and services underpinned by agile project management methodologies. We recognize the paramount significance of precise estimations in meeting client expectations and project deadlines.
Our approach to estimations revolves around close collaboration with our clients. We understand that every project is unique, and client preferences play a crucial role in defining the scope and scale of software development initiatives. By actively engaging with our clients, we gain deep insights into their specific requirements, priorities, and budgetary constraints. Leave your contacts, and we will provide you with estimations in 24 hours.
At Axon, we have extensive expertise in seamlessly integrating Google Maps into a wide range of applications. Our skilled team of software engineers and developers has hands-on experience in harnessing the full potential of Google Maps to enhance the navigational capabilities and user experiences of our clients' applications.
With a deep understanding of both the front-end and back-end aspects of development, our experts can craft customized solutions that precisely meet your unique requirements. Whether you need to integrate Google Maps into a web application, a mobile app, or both, we have the knowledge and skills to deliver a polished and user-friendly mapping experience.
Facilitate advanced location services and dynamic mapping within your application by exploring the seamless Google Maps app integration, ensuring an enriched user experience
Throughout the software engineering process, our team has demonstrated a well-established track record of collaboration and professionalism when working with our esteemed partners.
Our team's agility enables us to embrace change and tackle complex challenges with confidence. We approach each project with a flexible mindset, tailoring our methodologies to suit the unique requirements and goals of our clients. Through agile project management, we ensure that our solutions are scalable, maintainable, and adaptable to future needs.
Check out the latest blog post of Axon’s CEO - How Axon works on delivering extra benefits to the clients
In conclusion, integrating Google Maps into your application empowers you to provide valuable location-based features and improve the overall user experience. Whether you are creating a web or mobile application, incorporating maps, markers, directions, and geocoding can elevate your project to new heights. By following the steps outlined in this blog post and leveraging the vast array of Google Maps' offerings, you can create a compelling and functional application that captivates users and meets their location-based needs. So, embrace the power of Google Maps, and let your application navigate users to new horizons.
Are you ready to elevate your software development to the next level? Contact Axon today to discuss your project, and let's work together to design an application that not only meets your budget but also propels your business to new heights.
To integrate Google Maps into a mobile app, you need to get an API key from Google, set up the required permissions in your app, add the Google Maps SDK or library, and then customize the map features like markers or routes depending on your needs.
Common challenges include handling API limits, ensuring smooth map performance on different devices, managing user location permissions properly, and dealing with unexpected errors from the Google Maps service.
The team size depends on the project complexity, but generally, a small team of 2-4 developers with roles split between back-end, front-end, and mobile development is enough to handle a typical Google Maps integration.
Free product discovery workshop to clarify your software idea, define requirements, and outline the scope of work. Request for free now.


[1]

Head of Engineering

Head of Mobile Chapter

Head of Front-End Chapter

Head of QA Chapter

Business Development Manager
Leave your contacts and get clear and realistic estimations in the next 24 hours.