.jpg "Author Photo")
Need estimation?
Leave your contacts and get clear and realistic estimations in the next 24 hours.
Thank you! Your submission has been received!
Oops! Something went wrong while submitting the form.

Table of contentS
According to statistics, the biometric technologies market will evolve to reach $56 billion by 2027. The drivers of such a rapid development include speed and usability of biometric technologies in authentication processes, such as online payments, confidential data, etc.

Get acquainted with our expert guide on the Android biometric!
Biometrics are body measurements and calculations related to human characteristics. Biometric authentication (or realistic authentication) is used in computer science as a form of identification and access control. It is also used to identify individuals in groups that are under surveillance. Modern smartphones support different sensors, like fingerprint or facial recognition scanners which allow you to unlock your device or authenticate to various apps like bank apps or smartphone settings, confirm digital purchases, or something else. In Android biometric authentication, we have two types of biometrics: fingerprint and face recognition.
Let us a little bit introduce you to undercover fingerprint and facial recognition in Android:
The fingerprint sign in Android scans the user’s fingerprint. Then the vendor-specific library determines if there is a fingerprint match in the current set of enrolled fingerprint templates. After that, if the library found fingerprint matches, it passed the results to Android FingerprintService for future data processing. All of this is valid if the fingerprint is already enrolled for the Android device. For connection with vendor-specific libraries and, for example, fingerprint hardware, Android uses hardware interface definition language - HIDL. Fingerprint HIDL implements IBiometricsFingerprint.hal interface, which each Android application needs to communicate with FingerprintService.
Fingerprint authentication in Android is extremely popular. This Android fingerprint scanner tutorial will help you to find out the peculiarities of the biometric authentication. In general fingerprint hardware abstraction layer (HAL) interacts with:
These were the Android fingerprint scanner examples of interaction. Let’s take a look at the facial recognition.
Face authentication allows users to unlock their devices by looking at the front of their devices. Like fingerprint recognition, facial authentication implements interfaces like IBiometricsFace.hal and IBiometricsFaceClientCallback.hal to allow FaceService to communicate with vendor-specific library. Connection with app layer provided by BiometricsManager and BiometricsPrompt.
By the way, you don’t care about it. To implement Android biometric authentication, we will use the biometric library provided by Google.
Pros
Cons
The main goal of fingerprint authentication in Android is to keep user data from being accessed by third-party persons. Also, it facilitates user login to some applications without password input or confirmation of some purchase transaction.
Learn more about the factors affecting Android app development cost.
How to implement fingerprint scanner in Android? Everything is much easier that ypu could imagine. Take the following 5 steps:
First, you need to add a dependency for biometric authentication to your Gradle project file. You can import the actual version of the biometric library in the official documentation. Add this line to your Gradle project file into the dependencies block and click sync project:
dependencies {
implementation("androidx.biometric:biometric:input_version")
}There exist three types of biometrics authenticators in Android:
For better security of your application, we recommend you choose BIOMETRIC_STRONG type.
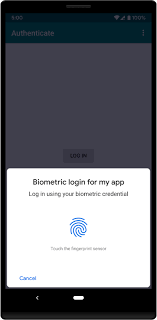
To specify what type of biometrics authenticator you want to use, you need to declare it in BiometricPromptInfo:
val promptInfo = BiometricPrompt.PromptInfo.Builder()
	.setTitle(biometric_prompt_custom_title)
	.setSubtitle(biometric_prompt_custom_subtitle)
	.setAllowedAuthenticators(BIOMETRIC_STRONG)
	.build()
Also, you can combine authenticator types like:
…
.setAllowedAuthenticators(BIOMETRIC_STRONG or DEVICE_CREDENTIALS)
…
Be careful, if you use the setNegativeButtonText() method in PromptInfo.Builder() you can’t use setAllowedAuthenticators(... or …) for the same BiometricPrompt instance! Also, you can’t use these combinations in Android 10 and lower: BIOMETRIC_STRONG or DEVICE_CREDENTIALS, DEVICE_CREDENTIALS.
Before allowing users to use biometrics in your application, you, as a developer, first need to check if biometrics are ready to use. Firstly you need to check if the user is already enrolled in biometrics (fingerprint or facial recognition) or if the device is secure (PIN, digital or graphical password). How to do that? BiometricManager will help you. That code will return true if biometrics are already enrolled or the device is already secured by PIN, password, etc.:
fun isBiometricsAvailable() = BiometricManager.from(context).canAuthenticate() == BiometricManager.BIOMETRIC_SUCCESS.You can implement that code, for example, in the use case and use it where you need. Also, in the same way, you can check different biometrics states using those BiometricManager constants:
For a better user experience in the use case when the user is still not enrolled in biometrics, you can redirect them to the smartphone's security settings by creating intent with action Settings.ACTION_BIOMETRIC_ENROLL to do that.
After we check if the biometric is enrolled and available, we can show the biometric prompt to the user. But not so fast. We must track the status of the biometric authentication, for example, when an attempt to authenticate will be a success, error, or failure. For that, we can use BiometricPrompt.AuthenticationCallback to override its callbacks:
onAuthenticationError();
onAuthenticationSucceeded();
onAuthenticationFailed().
It will be better if you make it centralized, for example, in some custom BiometricsManager class. Here is an example of a basic callback Kotlin implementation:
val executor = ContextCompat.getMainExecutor(this)
val biometricPrompt = BiometricPrompt(this, executor,
object : BiometricPrompt.AuthenticationCallback() {
override fun onAuthenticationError(errorCode: Int,
errString: CharSequence) {
super.onAuthenticationError(errorCode, errString)
// process biometrics authentication error here
}
override fun onAuthenticationSucceeded(
result: BiometricPrompt.AuthenticationResult) {
super.onAuthenticationSucceeded(result)
// process biometrics authentication succeed here
}
override fun onAuthenticationFailed() {
super.onAuthenticationFailed()
// process biometrics authentication failure here
}
}),After you override callbacks, you can show a biometric prompt to the user:
fun showBiometricPrompt(){
BiometricPrompt(fragmentActivity, executor, callback)
.authenticate(promptInfo)
}
Also, you can use Kotlin coroutines to send the biometric authentication result to the UI if you need it. Just create a suspend function showing a biometric prompt and catching the result. Here is an example:
suspend fun showBiometricPrompt() {
  suspendCoroutine { continuation ->
    val callback = object : BiometricPrompt.AuthenticationCallback() {
      override fun onAuthenticationError(errorCode: Int, errString: CharSequence) {
        super.onAuthenticationError(errorCode, errString)
        cont.resume(
          BiometricPromptResult.BiometricError(errorCode, errString.toString())
        )
      }

      override fun onAuthenticationSucceeded(result: BiometricPrompt.AuthenticationResult) {
        super.onAuthenticationSucceeded(result)
        cont.resume(BiometricPromptResult.BiometricSuccess(result))
      }
    }

    BiometricPrompt(fragmentActivity, executor, callback).authenticate(
      getBiometricPromptInfo()
    )
  }
}
You must decide where you will show the biometrics prompt dialog. For example, it will be a HomeActivity. Still, it will cause a data leak, a prompt dialog will show over HomeActivity, and some parts of the HomeActivity screen will be visible. A better solution is to create separate
empty activity. After you check in your SplashActivity if the user is logged in, you must open an empty activity where you will show a prompt dialog. After successful authentication, you must redirect the user to HomeActivity, for example. It will be more secure. But what if the user focuses on another application, and your application hides? How must we react if the user restores the application from the application manager? First, you must determine whether you will ask the user to authenticate whenever the application is restored. If not, you must determine how often a prompt dialog will be shown (each 3, 5, 8, 10 minutes, etc.). One of the best solutions to implement it is to use Application.AcitivityLifecycleCallbacks.
You must create some class and extend it with Application.AcitivityLifecycleCallbacks to implement callbacks where you will check if you need to show biometrics prompt dialog, for example in onActivityStarted() or in onActivityCreated(). Here is a Kotlin example:
class BiometricsCheckCallbacks : Application.ActivityLifecycleCallbacks {
.
.
.
override fun onActivityStarted(activity: Activity) {
// check here if time difference is more than required by you and navigate
user to the empty activity to show biometrics prompt dialog.
}
.
.
.
}Biometric authentication is rapidly becoming a popular component of multi-factor authentication strategies because it combines a strong authentication challenge with a user-friendly user interface. This technology is less vulnerable to hacking compared to passwords because the user's biometric data is unique.
Biometric authentication is used in a wide variety of applications across many industries. For example, some airlines and airports offer passengers the option to check in for flights using facial recognition. Financial institutions use biometric authentication as part of two-factor authentication or multi-factor authentication strategy to protect a bank and its customers from account takeover attacks. Also, fingerprint scanners, iris scanners, and facial recognition can help hospitals verify a patient's identity, ensure caregivers access the correct private medical information, and more.
At Axon, we work on biometric authentication in Android and iOS across various industries. And we are sure that this technology will only grow in popularity. The use of biometric characteristics for authentication will be used not only for unlocking mobile devices but also for organizing multi-factor authentication and instant confirmation of electronic payments.
Biometric authentication in Android has a heavy role in securing user interaction with data-sensitive applications. It will be used as an additional security level or feature that makes login flow easier. You will modify this solution, for example, add cryptography to increase biometrics data security. Otherwise, you can try to change the biometrics prompt dialog to your custom layout or whatever you want, but don’t reinvent the wheel and use material design documentation for a better user experience. Good luck!
Android biometric authentication uses physical characteristics like fingerprints or facial recognition to verify user identity quickly and securely, often replacing traditional passwords for tasks like unlocking devices or authorizing payments.
Advantages include fast, convenient access and improved security. Disadvantages can be occasional recognition errors and the need for compatible hardware, which may not be available on all devices.
Biometric authentication enhances security, reduces fraud risk, and improves user experience by speeding up login or payment processes, making it valuable for apps handling sensitive information or financial transactions.
Free product discovery workshop to clarify your software idea, define requirements, and outline the scope of work. Request for free now.


[1]
[2]
Leave your contacts and get clear and realistic estimations in the next 24 hours.