


Need estimation?
Leave your contacts and get clear and realistic estimations in the next 24 hours.
Thank you! Your submission has been received!
Oops! Something went wrong while submitting the form.

Table of contentS
The market for mobile apps has taken advantage of the times of social distancing and brought out a mass of innovations and new apps - both professionally and privately.
As users seek more personalized experiences and developers strive to ensure continuous value delivery, the seamless integration of subscription options presents a golden opportunity.
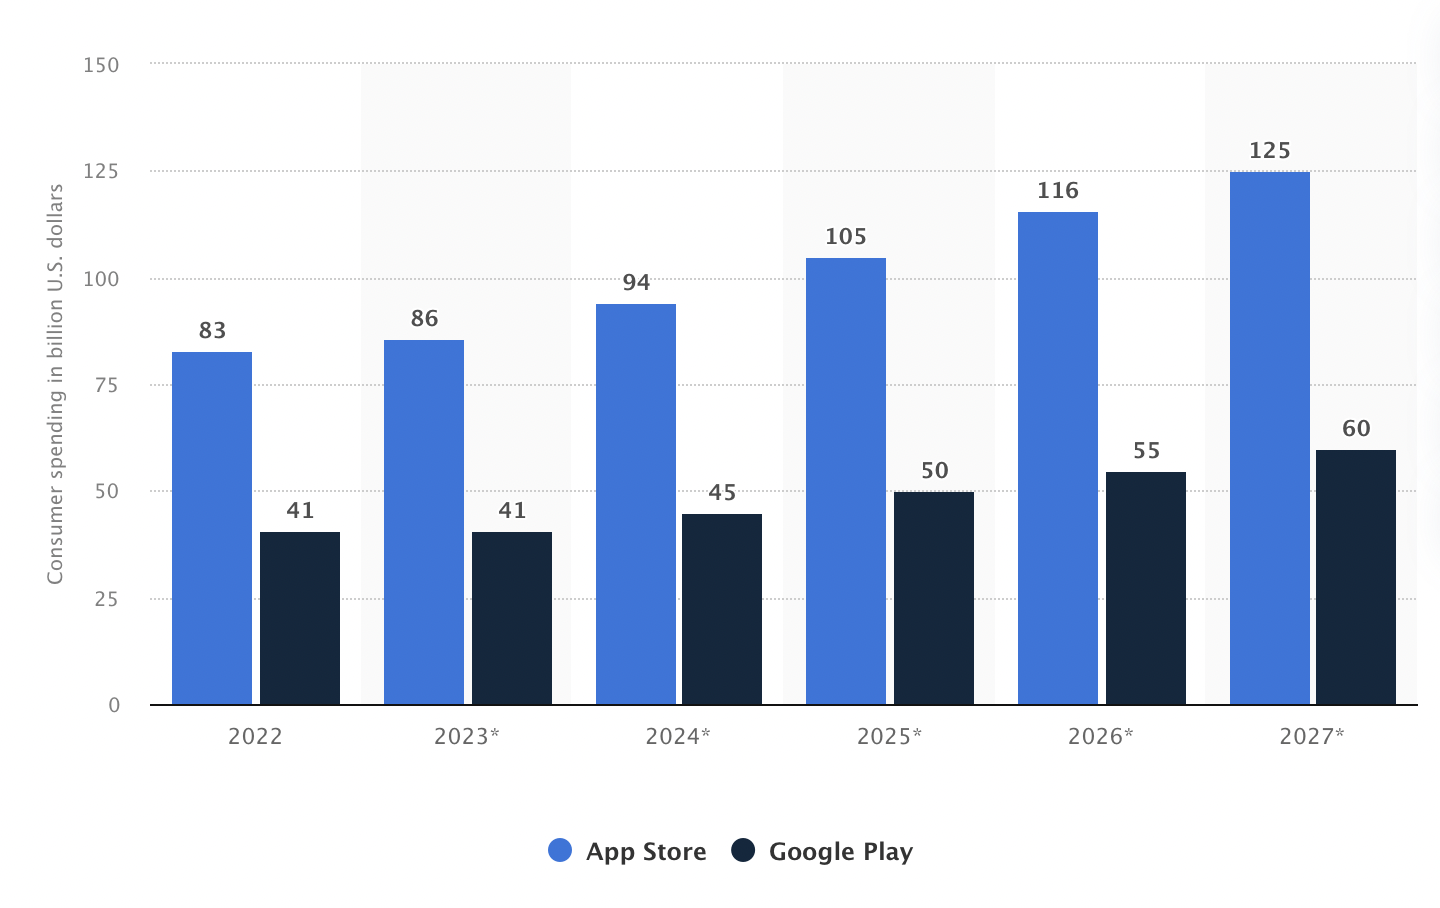
According to Statista, in 2027, people are expected to spend around $186 billion on mobile apps from the Apple App Store and Google Play. This is a big increase of over 50 percent compared to what consumers spent in total in 2022 on these two app platforms.
Offering subscription models and tailored plans within your application has become a pivotal strategy for both user satisfaction and sustainable revenue generation. This article delves into the essential insights and steps necessary to successfully implement subscriptions and plans into your application.
A subscription is a set of benefits that users can receive for a specified period of time. For example, a user with a subscription can watch videos from the application without ads and in better quality.
You can have multiple subscriptions within the same app, either to represent different sets of benefits, or different tiers of a single set of benefits (for example, “Basic” and “Premium” plans).
Through base plans and offers, you can create multiple configurations for the same subscription product. For example, you can create an introductory offer for users who have never subscribed to your app. Similarly, you can create an upgrade offer for users who are already subscribed.
For a detailed overview of subscription products, base plans, and offers, see the documentation in the Play Console Help Center.
The subscription-based app model has emerged as a dynamic and versatile approach in the modern business landscape. This model offers customers ongoing access to a product or service in exchange for regular payments, fostering a more predictable and sustainable revenue stream for businesses. The allure of subscription services lies in their ability to cultivate strong customer relationships, as users become invested in the value and benefits offered over time. For consumers, subscriptions often translate to enhanced convenience, continuous updates, and personalized experiences tailored to their evolving needs. As this model continues to gain traction across various industries, its potential to foster long-term loyalty and financial stability for businesses while providing enduring value to customers remains a compelling proposition.
Subscription-based apps offer both benefits and drawbacks for your project. Unlock sustainable revenue streams by understanding how to implement subscription model seamlessly, integrating user-friendly payment systems and delivering compelling content to cultivate a loyal user base.
Dive into the specifics of the fintech app cost!
For companies that create a subscription based app, it brings a steady and predictable stream of revenue, enabling them to plan and invest in continuous app improvements and updates. This model fosters stronger customer engagement as subscribers are more invested in the app's value, which can lead to increased user loyalty and longer-term relationships. Subscription-based apps often allow for a higher level of personalization and ongoing user support, enhancing the overall user experience.
However, there are drawbacks to consider. Some users might be hesitant to commit to recurring payments, which can lead to a smaller initial user base compared to one-time purchase apps. Implementing and maintaining a subscription system can be complex and require ongoing technical support. Additionally, the subscription based app model demands a consistent delivery of valuable content and features to justify the recurring payments, which could place pressure on your development team to continuously innovate. Striking the right balance between pricing and the perceived value of your app is also critical, as overpricing might deter potential subscribers, while underpricing could affect revenue generation.
If you are willing to create a subscription app, consider these benefits and drawbacks carefully to determine whether a subscription-based approach aligns with your project's goals and user base.
Subscription-based software examples showcase the versatility of this business model across various industries. Streaming services like Netflix and Spotify exemplify the entertainment sector's success with recurring payments, providing users access to vast libraries of movies, shows, and music. In the realm of productivity, Microsoft's Office 365 offers a suite of essential tools under a subscription umbrella, granting users continuous updates and cloud integration. Even creative endeavors benefit, as Adobe's Creative Cloud allows artists and designers to access a wide range of professional software applications through a subscription plan.
Some other subscription-based software examples:
How to create a subscription-based app? Planning your app involves a strategic approach to navigating the intricacies of how to create a subscription app. This process begins with a thorough understanding of your target audience and their needs, ensuring that the subscription model aligns with the value your app offers. Market research helps identify competitors and trends, providing insights to differentiate your app. Determining pricing tiers, benefits, and features is pivotal in enticing potential subscribers. The app's user interface and experience should be designed intuitively, simplifying the subscription process and enhancing user engagement. Technical considerations, like integrating a secure payment gateway and backend management, play a critical role in seamless subscription management. Let’s consider in detail how to create a subscription app both on the iOS and Android operating systems.
An In-App subscription is an increasingly popular way to monetize a mobile app. It involves collecting periodic payments in exchange for premium content and extended services.
Choose the Right Subscription Model
First of all, carefully consider the most suitable subscription model for your application. Common options include auto-renewable subscriptions and non-renewing subscriptions. Auto-renewable subscriptions are ideal for providing continuous value, while non-renewing subscriptions are better suited for finite services or content access.
Auto-renewable subscriptions allow you to break away from Apple's usual 70/30 revenue split. Apple incentivizes apps offering ongoing value by increasing the developer's share to 85% starting from the second year of subscription. If a user cancels or switches to another subscription group within 60 days, the one-year mark is reset. So, make sure your subscription offers an experience your users will want to keep for the long run.
Set Up Non-Renewing Subscriptions on App Store Connect
Set Up Auto-Renewable Subscriptions on App Store Connect
Integrate in-app purchases into your iOS app
import StoreKitImplement methods to fetch product information, make purchases, and process transactions. Your class should conform to the SKPaymentTransactionObserver protocol. For instance, you can create an IAPHelper that looks like this:
import StoreKit

protocol IAPHelperDelegate: AnyObject {
    func iapHelperDidFetchProducts(_ products: [SKProduct])
    func iapHelperDidFail(with error: Error)
    func iapHelperDidCompletePurchase()
}

class IAPHelper: NSObject, SKPaymentTransactionObserver {

    weak var delegate: IAPHelperDelegate?
    let monthlySubID = "MyApp.sub.allaccess.monthly"
    let yearlySubID = "MyApp.sub.allaccess.yearly"
    var products: [SKProduct] = []
    var purchaseCompletion: ((Result< Bool, Error>) -> Void)?

    override init() {
        super.init()
        SKPaymentQueue.default().add(self)
        fetchProducts()
    }

    private func fetchProducts() {
        let productIDs = Set([monthlySubID, yearlySubID])
        let request = SKProductsRequest(productIdentifiers: productIDs)
        request.delegate = self
        request.start()
    }

    func purchase(product: SKProduct) {
        guard SKPaymentQueue.canMakePayments() else {
            self.delegate?.iapHelperDidFail(with: IAPError.paymentsNotAllowed)
            return
        }

        let payment = SKPayment(product: product)
        SKPaymentQueue.default().add(payment)
    }

    func restorePurchases() {
        SKPaymentQueue.default().restoreCompletedTransactions()
    }
}

extension IAPHelper: SKProductsRequestDelegate {

    func productsRequest(_ request: SKProductsRequest, didReceive response: SKProductsResponse) {
        let products = response.products
        self.products = products

        // Notify the delegate that product fetching is completed successfully
        self.delegate?.iapHelperDidFetchProducts(products)
    }

    func request(_ request: SKRequest, didFailWithError error: Error) {
        // Notify the delegate that product fetching encountered an error
        self.delegate?.iapHelperDidFail(with: error)
    }
}

extension IAPHelper {
    // MARK: - SKPaymentTransactionObserver

    func paymentQueue(_ queue: SKPaymentQueue, updatedTransactions transactions: [SKPaymentTransaction]) {
        for transaction in transactions {
            switch transaction.transactionState {
            case .purchasing:
                // Transaction is in progress
                break

            case .purchased, .restored:
                // Transaction is successful
                // Finish transaction here and provide the purchased content
                SKPaymentQueue.default().finishTransaction(transaction)

                // Notify the delegate that the purchase is completed
                self.delegate?.iapHelperDidCompletePurchase()

            case .failed:
                // Transaction failed
                // Finish transaction here without providing the content
                SKPaymentQueue.default().finishTransaction(transaction)

                // Notify the delegate that the purchase failed
                self.delegate?.iapHelperDidFail(with: IAPError.purchaseFailed)

            case .deferred, .purchasing:
                // Do nothing, handle accordingly if needed
                break
            @unknown default:
                break
            }
        }
    }
}

extension SKProduct {
    var localizedPrice: String? {
        let formatter = NumberFormatter()
        formatter.numberStyle = .currency
        formatter.locale = priceLocale
        return formatter.string(from: price)
    }
}

enum IAPError: Error {
    case paymentsNotAllowed
    case productNotFound
    case purchaseFailed
    case restoreFailed

    var localizedDescription: String {
        switch self {
        case .paymentsNotAllowed:
            return "In-app purchases are not allowed on this device."
        case .productNotFound:
            return "The requested product was not found."
        case .purchaseFailed:
            return "The purchase process failed."
        case .restoreFailed:
            return "The restoration process failed."
        }
    }
}SKPaymentQueue: It's a queue managed by StoreKit where all transactions are held until they are processed, completed, or failed.
SKProduct: It represents a product that you have declared in iTunes Connect with all the necessary information, including pricing, localized title, description, and more.
SKPayment: It represents an intent to purchase a product. You create an SKPayment object with the corresponding SKProduct and add it to the SKPaymentQueue to initiate the purchase.
SKPaymentTransaction: It represents an event regarding a SKProduct purchase. You receive transaction updates through the
paymentQueue(_:updatedTransactions:)method in the SKPaymentTransactionObserver.
SKProductRequest: It's a request made to fetch information about SKProducts by providing their product IDs. It allows you to retrieve the necessary details about your products from the App Store.
SKProductResponse: It's the response obtained after making an SKProductRequest. It contains two lists:
Call the fetchProducts() method of the delegate to fetch the available products.
iapHelper?.fetchProducts()When the user initiates a subscription process, call the purchase(product:) method.
guard let productToPurchase = products.first else { return }
iapHelper?.purchase(product: productToPurchase)
If the purchase was successful iapHelperDidCompletePurchase will be called, where you can update UI granting access to premium content or unlocking features.
ReceiptModule DEFINITIONS ::=
BEGIN
ReceiptAttribute ::= SEQUENCE {
    type    INTEGER,
    version INTEGER,
    value   OCTET STRING
}
Payload ::= SET OF ReceiptAttribute
END
Validate the Receipt
To indicate that a user has purchased a product you need to perform receipt validation. There are two ways to verify a receipt’s authenticity:
Validating the receipt locally requires you to develop or use code to read and decode the receipt as a PKCS #7 container, as defined by RFC 2315. The App Store encodes the payload of the container using Abstract Syntax Notation One (ASN.1), as defined by ITU-T X.690. The payload contains a set of receipt attributes. Each receipt attribute contains a type, a version, and a value.
The App Store defines the structure of the payload with the following ASN.1 notation:
ReceiptModule DEFINITIONS ::=
BEGIN
ReceiptAttribute ::= SEQUENCE {
    type    INTEGER,
    version INTEGER,
    value   OCTET STRING
}
Payload ::= SET OF ReceiptAttribute
END
To validate the app receipt, perform the following tests in order:
The validation passes if all of the tests pass. If any test fails, the validation fails.
If your app receipt validation fails, respond to that failure as follows:
Manage subscriptions
Users can manage their subscriptions in their account settings on the App Store, where they see all renewal options and subscription groups, and can choose to upgrade, crossgrade, or downgrade between subscriptions as often as they like. You can also use the showManageSubscriptions(in:) method to allow them to do this within your app. When someone makes a change in their subscription level, the timing of the change varies depending on what has happened:
Test Subscriptions in App Store Connect Sandbox
The free version of an Apple Developer account won't allow you to set up subscriptions. You will need a paid one. Additionally, testing must be conducted on a real device, as simulators do not offer support for subscriptions.
When testing subscriptions in a development build of an app, Apple provides a test environment that allows you to "purchase" your subscription products without creating financial transactions.
Creating a Sandbox User:
Preparing the Device for Testing:
Testing Subscriptions:
Understanding Subscription Renewals in Sandbox:
When implementing subscriptions in your app, it is essential to follow best practices to ensure a successful and user-friendly experience. Avoid hardcoding product IDs and fetch them dynamically from your server to provide flexibility in offering various subscription options. Rely on Apple for subscription data such as prices and descriptions to facilitate changes without requiring app updates. Consider offering in-app subscription management options for upgrading, crossgrading, or downgrading, and include a deep link to Settings for easy subscription cancellation.
Sometimes understanding how to make a subscription app is not enough. Clearly describe subscriptions to help users understand what they are purchasing and prevent confusion. When managing prices, take existing subscribers into account and decide whether to increase prices incrementally or only for new users. Lastly, adhere to Apple's guidelines for in-app purchases to ensure smooth implementation and compliance.
Implementing a premium subscription builds app with a profitable and scalable business model. By following these best practices, you can create a seamless and successful subscription model that attracts and retains subscribers.
Use deep links to allow users to manage a subscription
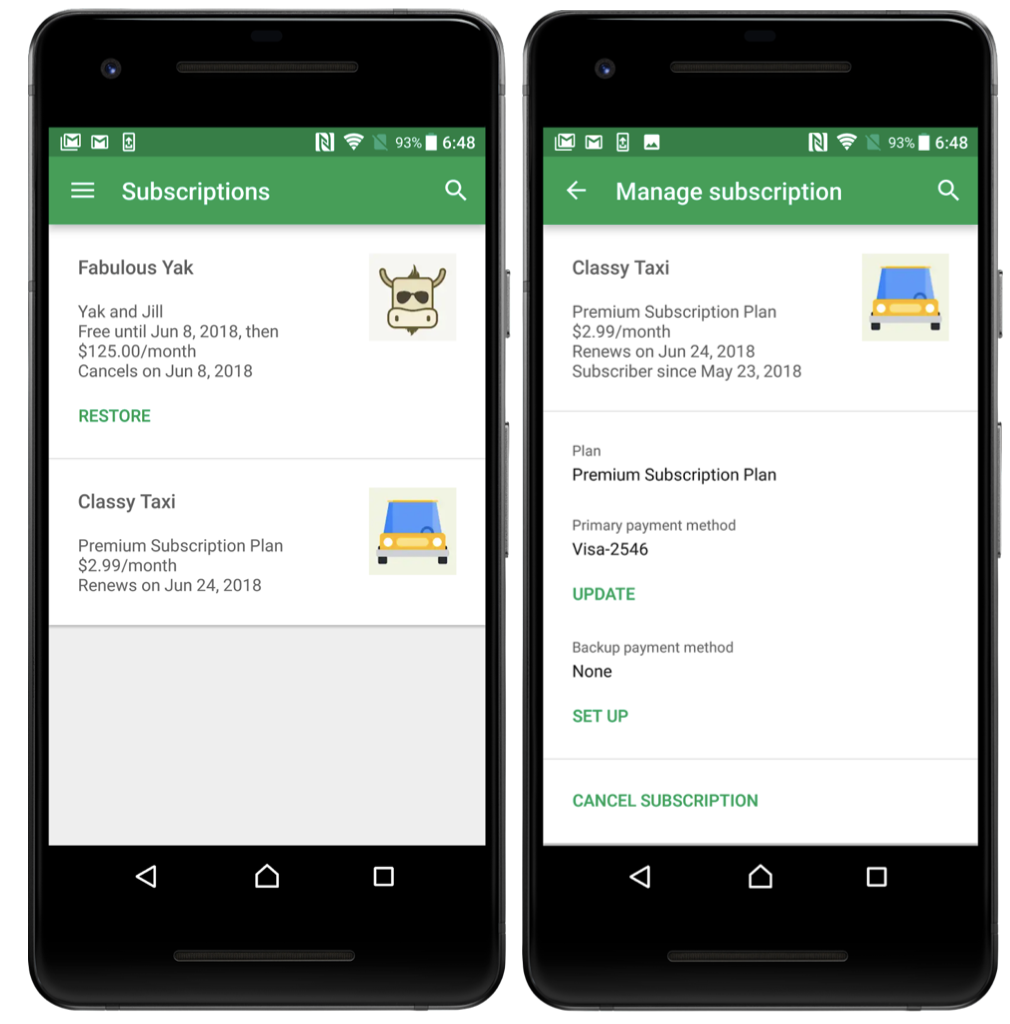
As a developer, you must make it easy for your customers to manage their subscription. Your app should include a link on a settings or preferences screen that allows users to manage their subscriptions. An example of this link is shown in figure below:

If the user has a non-expired subscription, you can direct them to a URL similar to the following, replacing "your-sub-product-id" and "your-app-package" with the subscription ID and app package info:
https://play.google.com/store/account/subscriptions?sku=your-sub-product-id&package=your-app-package
If a user doesn't have any non-expired subscriptions within your app, use the following URL to direct them to the page that shows all of their other subscriptions:
https://play.google.com/store/account/subscriptions
Allow users to upgrade, downgrade, or change their subscription
Users should be able to upgrade or downgrade a subscription. When upgrading or downgrading a subscription, you can set the proration mode that determines how the change affects your subscribers.
The following table lists available proration modes:
For a detailed overview of proration see the documentation in the Android Developers Docs.
Subscription setup
Google Play's billing system
Google Play's billing system is a service that enables you to sell digital products and content in your Android app. You can integrate Google Play's billing system with your Android app using the Play Billing Library.
You should also integrate Google Play's billing system with your server backend to create the necessary developer flows. This is essential to guarantee that your purchase management and cross-platform entitlements are efficient and secure.
Before integration, you need to create a developer account, and create and configure products in the Google Play Console.
For a detailed setup of a developer account, see how to setup a Google Play developer account.
Once you've set up a developer account, you must publish a version of your app that includes the Google Play Billing Library. This step is required to enable billing-related features in the Google Play Console, such as configuring the products you want to sell.
Add the Google Play Billing Library dependency to your app:
dependencies {
    val billing_version = "6.0.1"
    implementation("com.android.billingclient:billing-ktx:$billing_version")
}
Once you've added the library to your app, build and publish your app.
After that, you can create and configure your products.
Subscription integration
Life of purchase
Here's a typical purchase flow for a one-time purchase or a subscription.
Subscriptions automatically renew until they are canceled. A subscription can go through the following states:
Initialize a BillingClient
Once you've added a dependency on the Google Play Billing Library, you need to initialize a BillingClient instance. Is the main interface for communication between the Google Play Billing Library and the rest of your app.
To create a BillingClient, use newBuilder() :
private val purchasesUpdatedListener =
   PurchasesUpdatedListener { billingResult, purchases ->
       // To be implemented in a later section.
   }
private var billingClient = BillingClient.newBuilder(context)
   .setListener(purchasesUpdatedListener)
   .enablePendingPurchases()
   .build()
Connect to Google Play
After you have created a BillingClient, you need to establish a connection to Google Play.
To connect to Google Play, call startConnection():
billingClient.startConnection(object : BillingClientStateListener {
    override fun onBillingSetupFinished(billingResult: BillingResult) {
        if (billingResult.responseCode ==  BillingResponseCode.OK) {
            // The BillingClient is ready. You can query purchases here.
        }
    }
    override fun onBillingServiceDisconnected() {
        // Try to restart the connection on the next request to
        // Google Play by calling the startConnection() method.
    }
})
Show products available to buy
After you have established a connection to Google Play, you are ready to query for your available products and display them to your users. Ensure your product display follows all Play policies.
To query for in-app product details, call queryProductDetailsAsync():
val queryProductDetailsParams =
    QueryProductDetailsParams.newBuilder()
        .setProductList(
            ImmutableList.of(
                Product.newBuilder()
                    .setProductId("product_id_example")
                    .setProductType(ProductType.SUBS)
                    .build()))
        .build()
billingClient.queryProductDetailsAsync(queryProductDetailsParams) {
    billingResult,
    productDetailsList ->
      // check billingResult
      // process returned productDetailsList
}
)
Use product ID and ProductType which were created in Google Play Console. The ProductType can be either ProductType.INAPP for one-time products or ProductType.SUBS for subscriptions.
Querying with Kotlin extensions
You also can query for in-app product details by calling the queryProductDetails() extension function.
suspend fun processPurchases() {
    val productList = ArrayList<String>()
    productList.add(
              QueryProductDetailsParams.Product.newBuilder()
                  .setProductId("product_id_example")
                  .setProductType(BillingClient.ProductType.SUBS)
                  .build()
           )
    val params = QueryProductDetailsParams.newBuilder()
    params.setProductList(productList)
    // leverage queryProductDetails Kotlin extension function
    val productDetailsResult = withContext(Dispatchers.IO) {
        billingClient.queryProductDetails(params.build())
    }
    // Process the result.
}
Launch the purchase flow
To start a purchase request from your app, call the launchBillingFlow() method from your app's main thread:
// An activity reference from which the billing flow will be launched.
val activity : Activity = ...;
val productDetailsParamsList = listOf(
BillingFlowParams.ProductDetailsParams.newBuilder()
// retrieve a value for "productDetails" by calling queryProductDetailsAsync()
.setProductDetails(productDetails)
// to get an offer token, call ProductDetails.subscriptionOfferDetails()
// for a list of offers that are available to the user
.setOfferToken(selectedOfferToken)
.build()
)
val billingFlowParams = BillingFlowParams.newBuilder()
.setProductDetailsParamsList(productDetailsParamsList)
.build()
// Launch the billing flow
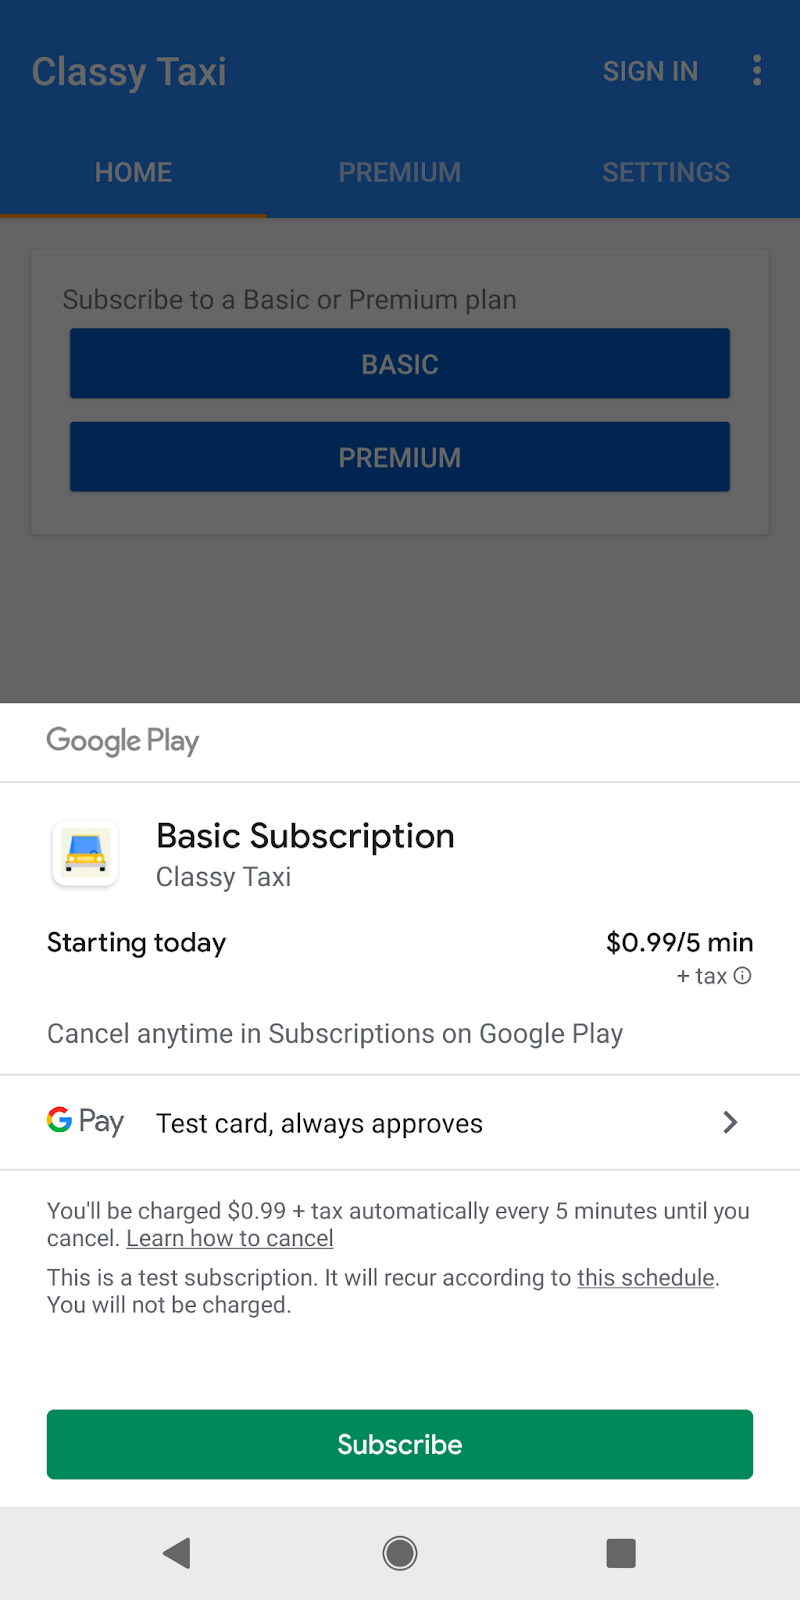
val billingResult = billingClient.launchBillingFlow(activity, billingFlowParams)On a successful call to launchBillingFlow(), the system displays the Google Play purchase screen:
You must implement onPurchasesUpdated() to handle possible response codes:
override fun onPurchasesUpdated(billingResult: BillingResult, purchases: List<Purchase>?) {
   if (billingResult.responseCode == BillingResponseCode.OK && purchases != null) {
       for (purchase in purchases) {
           handlePurchase(purchase)
       }
   } else if (billingResult.responseCode == BillingResponseCode.USER_CANCELED) {
       // Handle an error caused by a user cancelling the purchase flow.
   } else {
       // Handle any other error codes.
   }
}
Processing purchases
Once a user completes a purchase, your app then needs to process that purchase.
Your app should process a purchase in the following way:
To verify a purchase, first, check that the purchase state is PURCHASED.
After granting entitlement, your app must then acknowledge the purchase. This acknowledgment communicates to Google Play that you have granted entitlement for the purchase. If you don't acknowledge a purchase within three days, the user automatically receives a refund, and Google Play revokes the purchase.
The process to grant entitlement and acknowledge the purchase depends on whether the purchase is a consumable, non-consumable, or subscription.
val client: BillingClient = ...
val acknowledgePurchaseResponseListener: AcknowledgePurchaseResponseListener = ...
suspend fun handlePurchase() {
    if (purchase.purchaseState === PurchaseState.PURCHASED) {
        if (!purchase.isAcknowledged) {
            val acknowledgePurchaseParams = AcknowledgePurchaseParams.newBuilder()
                    .setPurchaseToken(purchase.purchaseToken)
            val ackPurchaseResult = withContext(Dispatchers.IO) {
               client.acknowledgePurchase(acknowledgePurchaseParams.build())
            }
        }
     }
}
Fetching purchases
To handle situations when your app could lose track or be unaware of purchases (such as Network Issues during the purchase, Multiple devices or Handling purchases made outside your app), be sure that your app calls BillingClient.queryPurchasesAsync() in your onResume() method to ensure that all purchases are successfully processed as described in processing purchases block.
queryPurchasesAsync() returns only active subscriptions and non-consumed one-time purchases.
queryPurchaseHistoryAsync() returns the most recent purchase made by the user for each product, even if that purchase is expired, canceled, or consumed.
val params = QueryPurchasesParams.newBuilder()
               .setProductType(ProductType.SUBS)
// uses queryPurchasesAsync Kotlin extension function
val purchasesResult = billingClient.queryPurchasesAsync(params.build())
// uses queryPurchaseHistory Kotlin extension function
val purchaseHistoryResult = billingClient.queryPurchaseHistory(params.build())
// check purchasesResult.billingResult
// process returned purchasesResult.purchasesList or purchaseHistoryResult.purchaseHistoryRecordList display the plans user owns
This completes the integration. You can test the app as indicated in the documentation Test your Google Play Billing Library integration.
The number of team members required to effectively implement subscriptions into your app depends on the complexity of the project and the scale of your application. At a minimum, you would typically need a dedicated project manager, one or more software developers with experience in app development and backend systems, a UI/UX designer to create user-friendly subscription interfaces, and a product manager to align the subscription model with your app's overall strategy. Additionally, having a quality assurance specialist to thoroughly test the subscription features and ensure a seamless user experience is crucial. If your app has unique technical or design requirements, you might need to expand the team to include specialists in those areas.
Axon takes pride in offering cutting-edge solutions and services underpinned by agile project management methodologies. We recognize the paramount significance of precise estimations in meeting client expectations and project deadlines.
Our approach to estimations revolves around close collaboration with our clients. We understand that every project is unique, and client preferences play a crucial role in defining the scope and scale of software development initiatives. By actively engaging with our clients, we gain deep insights into their specific requirements, priorities, and budgetary constraints. Leave your contacts, and we will provide you with estimations in 24 hours.
At Axon, we have extensive expertise in seamlessly implementing subscriptions and plans into a wide range of applications.
With a track record of delivering solutions that combine innovation and functionality, Axon significantly contributes to the app's enhanced user experience and revenue potential through unparalleled expertise in subscription integration. If you have doubts about how to make a subscription app, we are here to help.
Throughout the software engineering process, our team has demonstrated a well-established track record of collaboration and professionalism when working with our esteemed partners.
Our team's agility enables us to embrace change and tackle complex challenges with confidence. We approach each project with a flexible mindset, tailoring our methodologies to suit the unique requirements and goals of our clients. Through agile project management, we ensure that our solutions are scalable, maintainable, and adaptable to future needs.
In conclusion, the integration of subscriptions and tailored plans into your application holds the potential to revolutionize user engagement, satisfaction, and revenue streams. Through careful consideration of the steps outlined in this blog post, coupled with collaboration with skilled professionals, you can navigate this dynamic landscape with confidence.
With this article, you’ve learned how to make a subscription-based app by strategically implementing user-friendly payment gateways and crafting compelling content, ensuring sustained revenue and a loyal user base.
Remember that successful implementation extends beyond technical prowess; it involves understanding your users' needs, crafting intuitive interfaces, and aligning your subscription strategy with your app's overarching mission. As technology and user preferences continue to evolve, the ability to offer flexible, value-driven subscription models will be a cornerstone of sustained success!
When it comes to creating software solutions that not only meet but exceed your business objectives, partnering with a proven expert is paramount. That's where Axon, your trusted ally in software engineering, steps in. Our comprehensive services and dedicated team are here to streamline your development process, providing you with top-notch solutions while keeping a watchful eye on your budget.
Are you ready to elevate your software development to the next level? Contact Axon today to discuss your project, and let's work together to design an application that not only meets your budget but also propels your business to new heights.
Integration of subscriptions into your application opens up a list of opportunities for your business. After you figure out how to set up a subscription and implement it into your app, it enables a predictable revenue stream from your application, allowing your team to make strategic financial plans, which in turn leads to the long-term stability of your business. A subscription-based model allows you to focus on user retention, which later leads to higher LTV (customer lifetime value). Moreover, you can segment your audience by offering individual pricing plans, diversifying user segments, and increasing user satisfaction.
For building subscription-based iOS and Android apps, you can use In-App Purchases (IAP) from Apple and the Billing Library from Google Play. By using these tools, you can integrate recurring billing, pricing plans, user access management, trial periods, and auto-renewals. Of course, everyone is interested in how to build a subscription service with a predictable time and budget. Collaborating with an experienced team will provide you with clear estimations based on your specific business requirements and ensure the timely delivery of the desired functionality.
There is always something to learn from giants like Netflix, Spotify, or YouTube about how to create a subscription-based app. Netflix offers a tiered pricing model where users can choose subscription plans based on their preferences, such as the number of screens or video quality. Spotify and YouTube offer a free plan with ads and an ad-free premium subscription.
Free product discovery workshop to clarify your software idea, define requirements, and outline the scope of work. Request for free now.


[1]

Head of Engineering

Head of Mobile Chapter

Head of Front-End Chapter

Head of UI/UX Chapter

Head of Business Analysis Chapter
Leave your contacts and get clear and realistic estimations in the next 24 hours.